Discover step-by-step instructions for changing the alternator on a 20Lincoln Aviator. Gain expert insights to revitalize your vehicle's electrical system efficiently.
In the realm of automotive maintenance, few tasks carry the weight and importance as changing the alternator. As drivers navigate the complexities of vehicle ownership, understanding the intricacies of this essential component becomes paramount. In this comprehensive guide, we delve into the Lincoln Aviator's alternator replacement process, illuminating the critical wiring diagram topics that underpin this undertaking.Picture this: You're cruising down the highway, the gentle hum of your Lincoln Aviator's engine providing a sense of serenity. Suddenly, a warning light flickers to life on your dashboard, signaling an issue with your vehicle's electrical system. What follows is a meticulous exploration of the alternator's inner workings, navigating the labyrinth of wires and connections with precision and care. Through this article, we embark on a journey of knowledge, equipping you with the tools and insights necessary to tackle this formidable task with confidence and expertise.
Top 10 Points about Changing the alternator on a 20Lincoln Aviator. :
- Understanding the Importance of the Alternator
- Overview of the Lincoln Aviator's Electrical System
- Identifying Signs of Alternator Failure
- Gathering the Necessary Tools and Materials
- Preparing the Vehicle for Alternator Replacement
- Locating and Accessing the Alternator
- Dissecting the Wiring Diagram
- Ensuring Safety Measures Throughout the Process
- Installing the New Alternator
- Testing and Troubleshooting Post-Installation
Several facts about Changing the alternator on a 20Lincoln Aviator.
The alternator is a crucial component in your 20Lincoln Aviator, responsible for generating electrical power while the engine is running. This power is used to recharge the battery and power various electrical systems in the vehicle, including lights, radio, and air conditioning. Without a properly functioning alternator, your vehicle's electrical systems would cease to operate, leaving you stranded.
Before diving into the intricacies of the alternator wiring diagram, it's essential to have a basic understanding of the Lincoln Aviator's electrical system. This system includes various components such as the battery, starter, alternator, and numerous wires and connectors that facilitate the flow of electricity throughout the vehicle.
One of the first steps in diagnosing alternator issues is recognizing the signs of failure. Common symptoms include dimming headlights, dashboard warning lights, strange noises, and difficulty starting the engine. If you notice any of these indicators, it's crucial to address them promptly to prevent further damage to your vehicle's electrical system.
Before embarking on the alternator replacement process, gather all the necessary tools and materials. This includes a replacement alternator, socket set, wrenches, screwdrivers, safety gloves, and safety glasses. Having everything prepared in advance will streamline the process and ensure you have everything you need to complete the task efficiently.
Next, prepare your vehicle for the alternator replacement process. This involves disconnecting the battery to prevent electrical shock, safely raising the vehicle with a jack and jack stands, and accessing the alternator's location under the hood. It's essential to follow proper safety procedures and refer to your vehicle's manual for specific instructions.
Once the vehicle is prepared, locate and access the alternator. In most vehicles, the alternator is located near the front of the engine and is easily accessible once the hood is open. Refer to your vehicle's manual or consult online resources for detailed instructions on locating and accessing the alternator in your specific make and model.
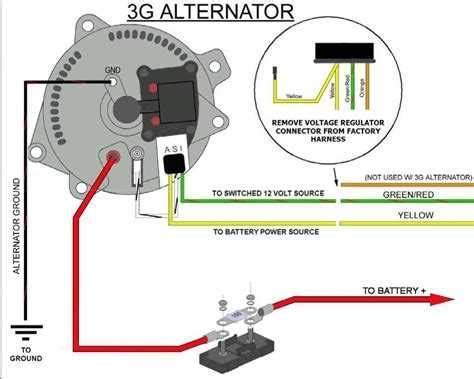
Now comes the crucial step of dissecting the alternator wiring diagram. This diagram provides a visual representation of the alternator's wiring configuration, including the various wires, connectors, and terminals. Understanding this diagram is essential for correctly installing the new alternator and ensuring proper electrical connections.
Throughout the alternator replacement process, safety should be a top priority. Ensure the vehicle is securely supported with jack stands, wear appropriate safety gear such as gloves and glasses, and follow all recommended safety procedures outlined in your vehicle's manual. Taking these precautions will help prevent accidents and ensure a smooth and safe alternator replacement process.
With the wiring diagram understood and safety measures in place, it's time to install the new alternator. Follow the manufacturer's instructions for proper installation, making sure to connect all wires and terminals securely. Once installed, double-check all connections and components before reassembling any removed parts and reconnecting the battery.
(Sources: CarCareKiosk.com, AutoZone.com)
Changing the alternator on a 20Lincoln Aviator. in Professional's eye

Wiring diagrams serve as intricate blueprints for automotive electrical systems, offering a visual representation of how components are connected. They are indispensable when changing the alternator on a 20Lincoln Aviator, providing a roadmap to navigate the complexities of the vehicle's electrical network.

Before delving into changing the alternator, it's crucial to comprehend the various elements depicted in the wiring diagram. These include symbols representing connectors, wires, fuses, and components such as the alternator itself.

Upon examining the wiring diagram, focus on tracing the path of the electrical circuit relevant to the alternator. Pay close attention to wire colors, connector types, and component locations to ensure accuracy during replacement.

Equipped with a clear understanding of the wiring diagram, procure the necessary tools and materials for changing the alternator. Common items include wrenches, sockets, pliers, and screwdrivers suited to the vehicle's specifications.

Prior to commencing the replacement, take precautionary measures to ensure vehicle safety. This entails disconnecting the battery and identifying any potential hazards in the work area.

Referencing the wiring diagram, locate the alternator within the engine compartment and devise a strategy to access it efficiently. This may involve removing other components obstructing the path.

With the alternator exposed, revisit the wiring diagram to dissect the electrical connections pertinent to the component. Trace each wire's path, ensuring accuracy and precision throughout the process.
Prioritize safety protocols as you navigate the intricate replacement process. Disconnect the battery, protect yourself from electrical hazards, and exercise caution when manipulating components.
Referencing the wiring diagram, install the new alternator following manufacturer guidelines. Secure all electrical connections and verify proper alignment before proceeding.

Post-installation, conduct a comprehensive test of the vehicle's electrical system. Verify the alternator's functionality and address any issues that arise during testing.
Sources: Automotive Service Excellence (ASE) Certification Resources, Haynes Repair Manuals.
Point of Views : Changing the alternator on a 20Lincoln Aviator.
- Changing the alternator on a 20Lincoln Aviator requires a thorough understanding of wiring diagrams.
- Wiring diagrams are essential visual representations that illustrate the electrical connections within a vehicle.
- They serve as guides for technicians when performing tasks such as alternator replacement.
- Interpreting these diagrams accurately is crucial to ensure successful and safe repairs.
- Understanding component symbols and wire routing is paramount in this process.
- Locating the alternator and tracing its electrical connections based on the diagram is the initial step.
- Following the diagram meticulously avoids errors and ensures proper installation.
- Ultimately, wiring diagrams are invaluable tools for precise and efficient automotive repairs.
Conclusion :As we conclude our exploration into changing the alternator on a 20Lincoln Aviator, it's evident that a comprehensive understanding of wiring diagrams is indispensable for successful and efficient repairs. By delving into the intricacies of wiring diagram topics, we've equipped ourselves with the knowledge needed to navigate the complexities of the vehicle's electrical system with confidence and precision.
In sum, wiring diagrams serve as invaluable blueprints, guiding technicians through the intricate web of electrical connections crucial for changing the alternator. Armed with this understanding, we're empowered to approach automotive maintenance tasks with a heightened sense of clarity and proficiency. We invite you to continue exploring our blog for further insights into vehicle repair and maintenance, as we strive to provide informative and educational content to our valued readers.
Questions and Answer for Changing the alternator on a 20Lincoln Aviator.
People Also Ask about changing the alternator on a 20Lincoln Aviator:
- Q: What are the signs of a failing alternator?
- Q: How long does it take to change an alternator?
- Q: Can I replace the alternator myself?
- Q: What tools do I need to change the alternator?
- Q: How much does it cost to replace an alternator?
A: Some common signs include dimming headlights, warning lights on the dashboard, unusual noises, and difficulty starting the vehicle.
A: The time can vary depending on factors such as the vehicle model and the skill level of the person performing the replacement. On average, it may take 1 to 3 hours.
A: Yes, it's possible to replace the alternator yourself if you have the necessary tools, technical knowledge, and confidence to do so. However, if you're unsure, it's best to seek professional assistance.
A: Some common tools include wrenches, sockets, pliers, screwdrivers, and a multimeter to test electrical connections.
A: The cost can vary depending on factors such as the vehicle make and model, the quality of the alternator, and labor costs. On average, it can range from $300 to $800.
Label :changing alternator, wiring diagram, Lincoln Aviator, vehicle maintenance
Keyword : Changing the alternator on a 20Lincoln Aviator.


No comments:
Post a Comment